Java Spring Boot
By Jim Anderson
Spring Boot and Spring Security support OIDC natively, enabling you to add authentication to your application without the need for any additional libraries. This guide demonstrates how to integrate Auth0 with any new or existing Spring Boot 2 web application. We recommend that you log in to follow this quickstart with examples configured for your account.
I want to integrate with my app
15 minutesI want to explore a sample app
2 minutesGet a sample configured with your account settings or check it out on Github.
Using Spring WebFlux?
This tutorial uses Spring MVC. If you are using Spring WebFlux, the steps to add authentication are similar, but some of the implementation details are different. Refer to the Spring Boot WebFlux Sample Code to see how to integrate Auth0 with your Spring Boot WebFlux application.
Configure Auth0
Get Your Application Keys
When you signed up for Auth0, a new application was created for you, or you could have created a new one. You will need some details about that application to communicate with Auth0. You can get these details from the Application Settings section in the Auth0 dashboard.
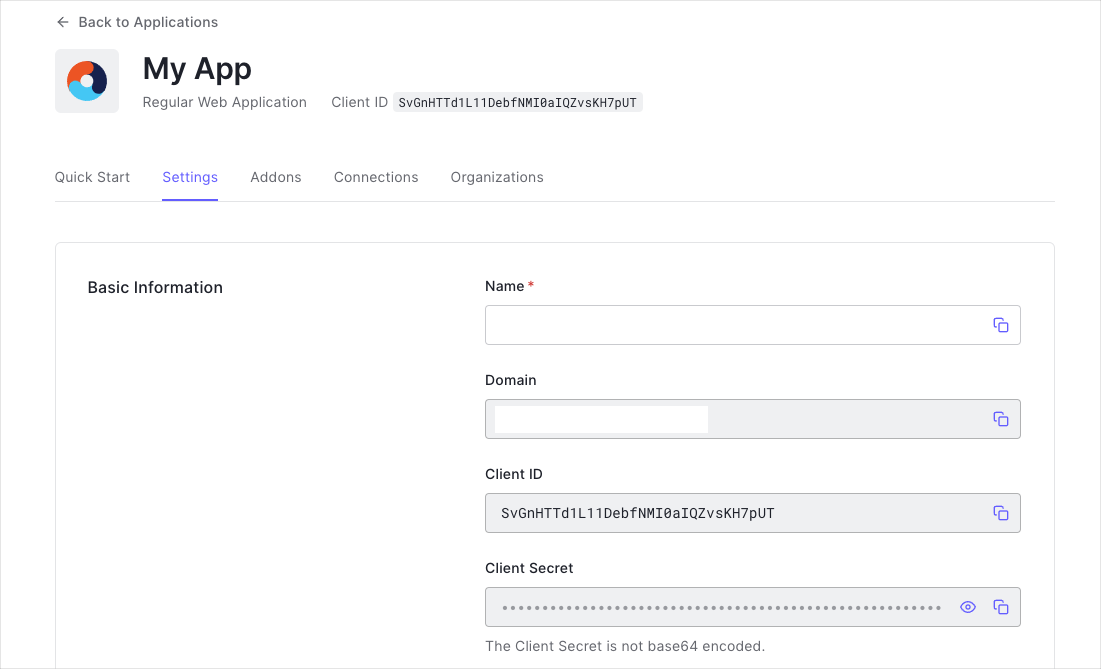
You need the following information:
- Domain
- Client ID
- Client Secret
Configure Callback URLs
A callback URL is a URL in your application where Auth0 redirects the user after they have authenticated. The callback URL for your app must be added to the Allowed Callback URLs field in your Application Settings. If this field is not set, users will be unable to log in to the application and will get an error.
Configure Logout URLs
A logout URL is a URL in your application that Auth0 can return to after the user has been logged out of the authorization server. This is specified in the returnTo query parameter. The logout URL for your app must be added to the Allowed Logout URLs field in your Application Settings. If this field is not set, users will be unable to log out from the application and will get an error.
Configure Spring Boot Application
Add Spring dependencies
Spring Boot provides a spring-boot-starter-oauth2-client starter, which provides all the Spring Security dependencies needed to add authentication to your web application.
If you're using Gradle, you can include these dependencies as shown below.
plugins {
    id 'java'
    id 'org.springframework.boot' version '2.5.12'
    id 'io.spring.dependency-management' version '1.0.9.RELEASE'
}

implementation 'org.springframework.boot:spring-boot-starter-web'
implementation 'org.springframework.boot:spring-boot-starter-oauth2-client'
implementation 'org.springframework.boot:spring-boot-starter-thymeleaf'
implementation 'org.thymeleaf.extras:thymeleaf-extras-springsecurity5'
Was this helpful?
If you are using Maven:
<parent>
    <groupId>org.springframework.boot</groupId>
    <artifactId>spring-boot-starter-parent</artifactId>
    <version>2.5.12</version>
    <relativePath/>
</parent>

<dependencies>
    <dependency>
        <groupId>org.springframework.boot</groupId>
        <artifactId>spring-boot-starter-web</artifactId>
    </dependency>
    <dependency>
        <groupId>org.springframework.boot</groupId>
        <artifactId>spring-boot-starter-oauth2-client</artifactId>
    </dependency>
    <dependency>
        <groupId>org.springframework.boot</groupId>
        <artifactId>spring-boot-starter-thymeleaf</artifactId>
    </dependency>
    <dependency>
        <groupId>org.thymeleaf.extras</groupId>
        <artifactId>thymeleaf-extras-springsecurity5</artifactId>
    </dependency>
</dependencies>
Was this helpful?
Configure Spring Security
Spring Security makes it easy to configure your application for authentication with OIDC providers such as Auth0. In your application's configuration, configure the OAuth2 client and provider. The sample below uses an application.yml file, though you can also use properties files or any of the other supported externalization mechanisms.
# src/main/resources/application.yml
spring:
  security:
    oauth2:
      client:
        registration:
          auth0:
            client-id: {yourClientId}
            client-secret: YOUR_CLIENT_SECRET
            scope:
              - openid
              - profile
              - email
        provider:
          auth0:
            # trailing slash is important!
            issuer-uri: https://{yourDomain}/
Was this helpful?
Add Login to Your Application
To enable user login with Auth0, create a class that will provide an instance of SecurityFilterChain, and add the @EnableWebSecurity annotation.
package com.auth0.example;

import org.springframework.context.annotation.Bean;
import org.springframework.security.config.annotation.web.builders.HttpSecurity;
import org.springframework.security.config.annotation.web.configuration.EnableWebSecurity;
import org.springframework.security.web.SecurityFilterChain;

@EnableWebSecurity
public class SecurityConfig {

    @Bean
    public SecurityFilterChain filterChain(HttpSecurity http) throws Exception {
        return http.oauth2Login()
                .and().build();
    }
}
Was this helpful?
Spring Security will use the client configuration you defined earlier to handle login when a user visits the /oauth2/authorization/auth0 path of your application. You can use this to create a login link in your application.
<!-- src/main/resources/templates/index.html -->
<html lang="en" xmlns:th="http://www.thymeleaf.org" xmlns:sec="http://www.thymeleaf.org/thymeleaf-extras-springsecurity5">
    <body>
        <div sec:authorize="!isAuthenticated()">
            <a th:href="@{/oauth2/authorization/auth0}">Log In</a>
        </div>
        <div sec:authorize="isAuthenticated()">
            <p>You are logged in!</p>
        </div>
    </body>
</html>
Was this helpful?
Be sure to create or update a controller to render your view.
package com.auth0.example;

import org.springframework.security.core.annotation.AuthenticationPrincipal;
import org.springframework.security.oauth2.core.oidc.user.OidcUser;
import org.springframework.stereotype.Controller;
import org.springframework.ui.Model;
import org.springframework.web.bind.annotation.GetMapping;

/**
 * Controller for the home page.
 */
@Controller
public class HomeController {

    @GetMapping("/")
    public String home(Model model, @AuthenticationPrincipal OidcUser principal) {
        return "index";
    }
}
Was this helpful?
Checkpoint
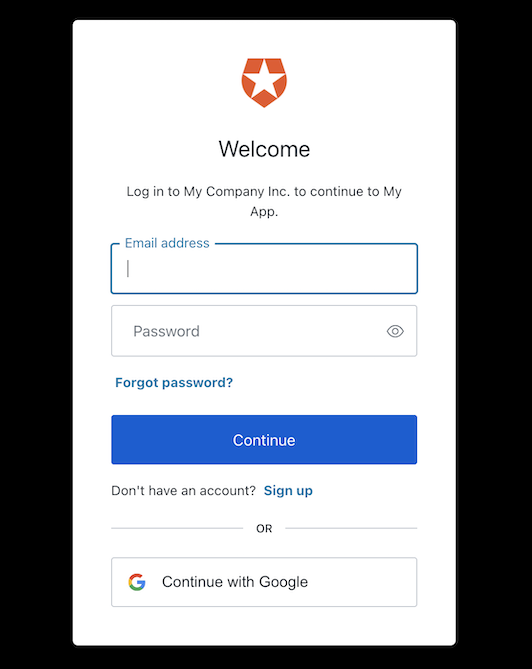
Add the login link to your application. When you click it, verify that your application redirects you to the Auth0 Universal Login page and that you can now log in or sign up using a username and password or a social provider.
Once that's complete, verify that Auth0 redirects you to your application and that you are logged in.
Add Logout to Your Application
Now that users can log into your application, they need a way to log out. By default, when logout is enabled, Spring Security will log the user out of your application and clear the session. To enable successful logout of Auth0, you can extend the SecurityContextLogoutHandler class to redirect users to your Auth0 logout endpoint (https://{yourDomain}/v2/logout) and then immediately redirect them to your application.
package com.auth0.example;

import org.springframework.beans.factory.annotation.Autowired;
import org.springframework.security.core.Authentication;
import org.springframework.security.oauth2.client.registration.ClientRegistration;
import org.springframework.security.oauth2.client.registration.ClientRegistrationRepository;
import org.springframework.security.web.authentication.logout.SecurityContextLogoutHandler;
import org.springframework.stereotype.Controller;
import org.springframework.web.servlet.support.ServletUriComponentsBuilder;
import org.springframework.web.util.UriComponentsBuilder;

import javax.servlet.http.HttpServletRequest;
import javax.servlet.http.HttpServletResponse;
import java.io.IOException;

/**
 * Needed to perform SSO logout with Auth0. By default, Spring will clear the SecurityContext and the session.
 * This controller will also log users out of Auth0 by calling the Auth0 logout endpoint.
 */
@Controller
public class LogoutHandler extends SecurityContextLogoutHandler {

    private final ClientRegistrationRepository clientRegistrationRepository;

    /**
     * Create a new instance with a {@code ClientRegistrationRepository}, so that we can look up information about the
     * configured provider to call the Auth0 logout endpoint. Called by the Spring framework.
     *
     * @param clientRegistrationRepository the {@code ClientRegistrationRepository} for this application.
     */
    @Autowired
    public LogoutHandler(ClientRegistrationRepository clientRegistrationRepository) {
        this.clientRegistrationRepository = clientRegistrationRepository;
    }

    /**
     * Delegates to {@linkplain SecurityContextLogoutHandler} to log the user out of the application, and then logs
     * the user out of Auth0.
     *
     * @param httpServletRequest the request.
     * @param httpServletResponse the response.
     * @param authentication the current authentication.
     */
    @Override
    public void logout(HttpServletRequest httpServletRequest, HttpServletResponse httpServletResponse,
                       Authentication authentication) {

        // Invalidate the session and clear the security context
        super.logout(httpServletRequest, httpServletResponse, authentication);

        // Build the URL to log the user out of Auth0 and redirect them to the home page.
        // URL will look like https://YOUR-DOMAIN/v2/logout?clientId=YOUR-CLIENT-ID&returnTo=http://localhost:3000
        String issuer = (String) getClientRegistration().getProviderDetails().getConfigurationMetadata().get("issuer");
        String clientId = getClientRegistration().getClientId();
        String returnTo = ServletUriComponentsBuilder.fromCurrentContextPath().build().toString();

        String logoutUrl = UriComponentsBuilder
                .fromHttpUrl(issuer + "v2/logout?client_id={clientId}&returnTo={returnTo}")
                .encode()
                .buildAndExpand(clientId, returnTo)
                .toUriString();

        try {
            httpServletResponse.sendRedirect(logoutUrl);
        } catch (IOException ioe) {
            // Handle or log error redirecting to logout URL
        }
    }

    /**
     * Gets the Spring ClientRegistration, which we use to get the registered client ID and issuer for building the
     * {@code returnTo} query parameter when calling the Auth0 logout API.
     *
     * @return the {@code ClientRegistration} for this application.
     */
    private ClientRegistration getClientRegistration() {
        return this.clientRegistrationRepository.findByRegistrationId("auth0");
    }
}
Was this helpful?
Next, you need to update your implementation of SecurityFilterChain to register your logout handler and specify the request path that should trigger logout (/logout in the example below).
package com.auth0.example;

import org.springframework.context.annotation.Bean;
import org.springframework.security.config.annotation.web.builders.HttpSecurity;
import org.springframework.security.config.annotation.web.configuration.EnableWebSecurity;
import org.springframework.security.web.SecurityFilterChain;
import org.springframework.security.web.util.matcher.AntPathRequestMatcher;

@EnableWebSecurity
public class SecurityConfig {

    private final LogoutHandler logoutHandler;

    public SecurityConfig(LogoutHandler logoutHandler) {
        this.logoutHandler = logoutHandler;
    }

    @Bean
    public SecurityFilterChain filterChain(HttpSecurity http) throws Exception {
        return http
                .oauth2Login()
                .and().logout()
                .logoutRequestMatcher(new AntPathRequestMatcher("/logout"))
                .addLogoutHandler(logoutHandler)
                .and().build();
    }
}
Was this helpful?
You can then update your view to add a logout link for authenticated users.
<div sec:authorize="isAuthenticated()">
    <p>You are logged in!</p>
    <a th:href="@{/logout}">Log Out</a>
</div>
Was this helpful?
Checkpoint
Add the logout link in the view of your application. When you click it, verify that your application redirects you the address you specified as one of the "Allowed Logout URLs" in the "Settings" and that you are no longer logged in to your application.
Show User Profile Information
You can retrieve the profile information associated with logged-in users through the OidcUser class, which can be used with the AuthenticationPrincipal annotation.
In your controller, add the user's profile information to the model:
@Controller
public class HomeController {

    @GetMapping("/")
    public String home(Model model, @AuthenticationPrincipal OidcUser principal) {
        if (principal != null) {
            model.addAttribute("profile", principal.getClaims());
        }
        return "index";
    }
}
Was this helpful?
You can then use this profile information in your view, as shown below.
<div sec:authorize="isAuthenticated()">
    <img th:src="${profile.get('picture')}" th:attr="alt=${profile.get('name')}"/>
    <h2 th:text="${profile.get('name')}"></h2>
    <p th:text="${profile.get('email')}"></p>
    <a th:href="@{/logout}">Log Out</a>
</div>
Was this helpful?
Checkpoint
Verify that you can display the user name or any other user property after you have logged in.