Laravel
By Evan Sims
This guide demonstrates how to integrate Auth0 with a Laravel application using the Auth0 Laravel SDK. We recommend that you log in to follow this quickstart with examples configured for your account.
I want to integrate with my app
15 minutesI want to explore a sample app
2 minutesGet a sample configured with your account settings or check it out on Github.
Configure Auth0
Get Your Application Keys
When you signed up for Auth0, a new application was created for you, or you could have created a new one. You will need some details about that application to communicate with Auth0. You can get these details from the Application Settings section in the Auth0 dashboard.
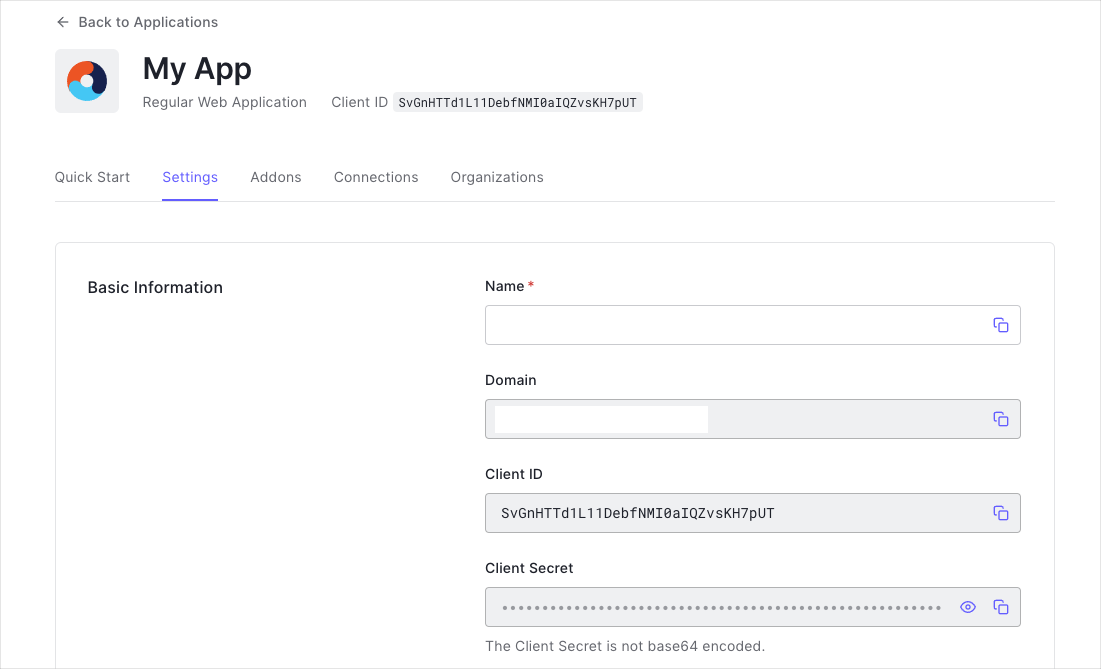
You need the following information:
- Domain
- Client ID
- Client Secret
Configure Callback URLs
A callback URL is a URL in your application where Auth0 redirects the user after they have authenticated. The callback URL for your app must be added to the Allowed Callback URLs field in your Application Settings. If this field is not set, users will be unable to log in to the application and will get an error.
Configure Logout URLs
A logout URL is a URL in your application that Auth0 can return to after the user has been logged out of the authorization server. This is specified in the returnTo query parameter. The logout URL for your app must be added to the Allowed Logout URLs field in your Application Settings. If this field is not set, users will be unable to log out from the application and will get an error.
Create a Laravel Application
Let's begin by setting up a new Laravel application. Let's open a shell and run the following command — replacing DIRECTORY_NAME with a directory name of preference to create and install Laravel within. The directory cannot already exist.
composer create-project --prefer-dist laravel/laravel DIRECTORY_NAMEWas this helpful?
We'll refer to this new directory as our project's root directory. As we work through this tutorial, we'll run any instructed shell commands from within that directory.
Install the SDK
Let's install the Auth0's Laravel SDK to protect our new Laravel application's routes. The SDK offers a range of middleware types and router controllers that will help us integrate authentication and protect our application's routes.
From a shell opened to our project's root directory, let's use Composer to install the SDK in our application:
composer require auth0/loginWas this helpful?
Configure the SDK
Next, let's create the SDK's configuration file. Again from a shell opened to our projects root directory, let's use Laravel's the vendor:publish command to import the configuration file into our application:
php artisan vendor:publish --tag auth0-configWas this helpful?
Now we can begin configuring our Auth0 integration by adding options to the .env file in our project's root directory. Let's open that .env file and add some essential details for our project:
# The URL of your Auth0 tenant domain
# You'll find this in your Auth0 Application's settings page.
AUTH0_DOMAIN={yourDomain}

# Your Auth0 application's Client ID
# You'll find this in your Auth0 Application's settings page.
AUTH0_CLIENT_ID={yourClientId}

# Your Auth0 application's Client ID
# You'll find this in your Auth0 Application's settings page.
AUTH0_CLIENT_SECRET={yourClientSecret}

# Your Auth0 Custom API identifier/audience.
# You'll find this in your Custom API's settings page.
AUTH0_AUDIENCE={yourApiIdentifier}

# Authentication callback URI, as defined in your Auth0 Application settings.
# (You must configure this in your AUth0 Application's settings page as well!)
AUTH0_REDIRECT_URI=http://localhost:3000/auth0/callback
Was this helpful?
Configure the application
Now let's connect our Laravel application with the SDK so we can begin working with our Auth0 integration. For this, we'll be making changes to our config\auth.php file. This file contains a lot of settings, but we only need to make a few small changes.
To start, let's find the defaults section. We'll set the default guard to auth0, like this:
// 📂 config/auth.php

'defaults' => [
    'guard' => 'auth0',
    // 📝 Leave any other settings in this section alone.
],
Was this helpful?
Next, find the guards section, and add auth0 there:
// 👆 Continued from above, in config/auth.php

'guards' => [
    // 📝 Any additional guards you use should stay here, too.

    'auth0' => [
        'driver' => 'auth0',
        'provider' => 'auth0',
    ],
],
Was this helpful?
Finally, find the providers section, and add auth0 there as well:
// 👆 Continued from above, in config/auth.php

'providers' => [
    // 📝 Any additional providers you use should stay here, too.

    'auth0' => [
        'driver' => 'auth0',
        'repository' => \Auth0\Laravel\Auth\User\Repository::class
    ],
],
Was this helpful?
Authentication routes
To make setting up authentication a cinch, the SDK includes some plug-and-play router controllers we can setup some routes with. Let's edit our routes/web.php file to add those now:
// 📂 routes/web.php
// 👆 Keep anything already present in the file, just add the following ...

Route::get('/login', \Auth0\Laravel\Http\Controller\Stateful\Login::class)->name('login');
Route::get('/logout', \Auth0\Laravel\Http\Controller\Stateful\Logout::class)->name('logout');
Route::get('/auth0/callback', \Auth0\Laravel\Http\Controller\Stateful\Callback::class)->name('auth0.callback');
Was this helpful?
- We'll direct our end users to the
/loginroute when they want to login, where they'll use Auth0's Universal Login Page to authenticate with our app. - The
/logoutroute will redirect them to Auth0's logout endpoint and sign them out of our application. - The
/auth0/callbackroute handles some important final authentication matters for us after the user logs in, and sets up the user's local session with our application.
Protecting routes
Now we can setup our routes using the SDK's middleware to automatically protect parts of our application. For this type of application there are two types of middleware available — so let's create a few routes to demonstrate them!
We'll need to again edit our routes/web.php file, and add the following routes to that file:
// 📂 routes/web.php
// 👆 Keep anything already present in the file, just add the following ...

Route::get('/', function () {
    if (Auth::check()) {
        return view('auth0.user');
    }

    return view('auth0/guest');
})->middleware(['auth0.authenticate.optional']);
Was this helpful?
This route demonstrates the auth0.authenticate.optional middleware. This middleware will resolve an available user session (allowing you to access the user's profile through the Auth::user() method) but won't block requests without a session, allowing you to treat those as "guest" requests.
Let's add another to that file:
// 👆 Continued from above, in routes/web.php

// Require an authenticated session to access this route.
Route::get('/required', function () {
    return view('auth0.user');
})->middleware(['auth0.authenticate']);
Was this helpful?
This middleware will reject requests from end users that aren't authenticated, limiting that route to requests from users with accounts.
Adding views
Last but not least, let's create a couple small Blade views that we defined in those routes; nothing fancy here, just for demonstration purposes.
Let's create our resources/views/auth0/guest.blade.php file:
// 📂 resources/views/auth0/guest.blade.php

<!DOCTYPE html>
<html>
    <body>
        <p>You're a guest. <a href="{{ route('login') }}">Log in</a></p>
    </body>
</html>
Was this helpful?
And finally, let's create our resources/views/auth0/user.blade.php file:
// 📂 resources/views/auth0/user.blade.php

<!DOCTYPE html>
<html>
    <body>
        <p>Welcome! You are authenticated. <a href="{{ route('logout') }}">Log out</a></p>
        <div>
            <pre><?php print_r(Auth::user()) ?></pre>
        </div>
    </body>
</html>
Was this helpful?
In a real world application you'll probably want to do something a bit more elaborate, but this will serve our needs here!
Run the application
We've installed Laravel and the SDK, configured our application, and set up some routes — all that's left is for us to try out our new application:
php artisan serve --port=3000Was this helpful?
We're all set our new application is live and waiting for us. Give it a try by loading http://localhost:3000 in your web browser.