Test SAML SSO with Auth0 as Service Provider and Identity Provider
You can configure Auth0 as both the service provider (SP) and the identity provider (IdP) to test your SAML single sign-on (SSO) connection.

Auth0 only supports using Auth0 as the SP in SAML configurations with SAML 1.1 or SAML 2.0 while you can use Auth0 as the IdP in SAML configurations with SAML 2.0.
You can set up a simple example application for testing that uses Auth0 to authenticate users through SAML SSO using one tenant as the SAML SP and another tenant as the SAML IdP. You will configure two federations for one tenant.
Create IdP tenant
If you do not already have a secondary Auth0 tenant to serve as a SAML IdP, you will need to create one:
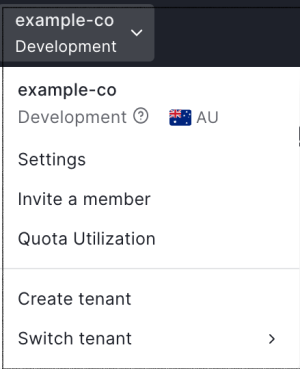
Go to the Auth0 Dashboard, select your tenant name and select Create Tenant.

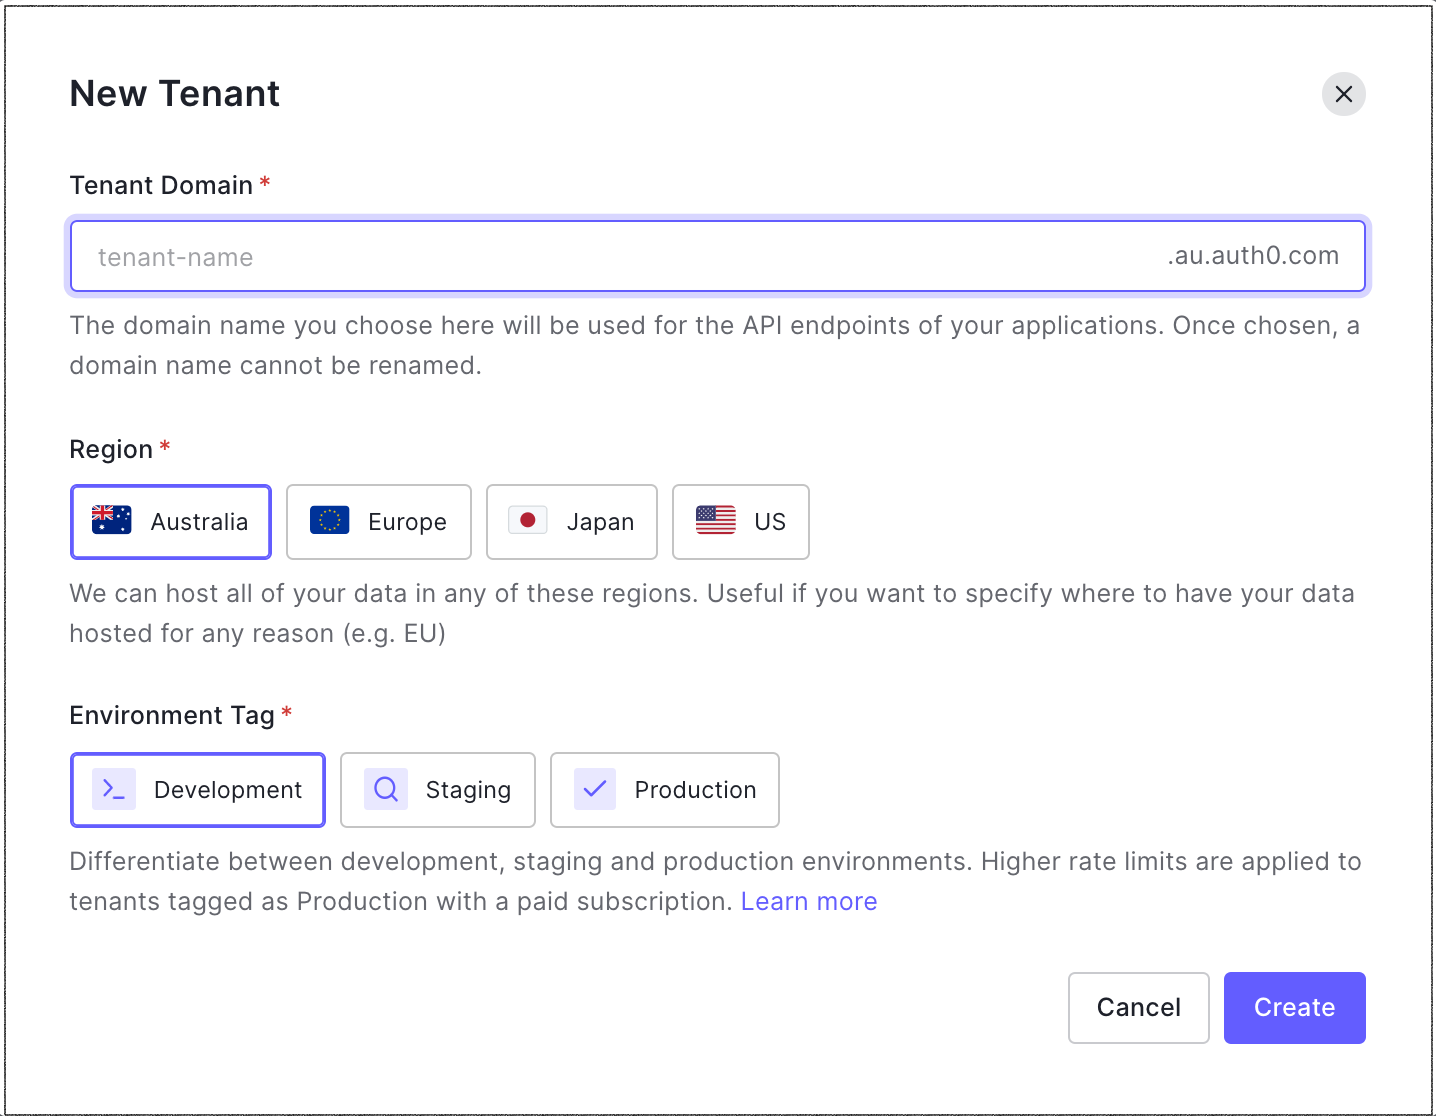
Enter a Domain, select a Region, and click Create.

Configure IdP tenant
Configure your secondary tenant as an IdP, and register an application to represent your SP tenant.
Switch to your IdP tenant. Open the tenant menu, select Switch Tenant, and then select your IdP tenant.
Navigate to Dashboard > Applications > Applications and select Create Application.
Enter a name for the application, such as
my-auth0-idp, select Regular Web Application for the application type, and then select Create.Go to the bottom of the Settings page, and select Show Advanced Settings.
Switch to the Certificates view, then select Download Certificate, and choose PEM. The certificate will download. You will use this certificate when you configure the SP tenant.
Switch to the Endpoints view, locate SAML Protocol URL, and copy its contents. You will use this URL when you configure the SP tenant.
Create user to test SAML sequence
Go to Dashboard > User Management > Users and select Create User.
Enter an email address for your test user. The domain name should match the service provider tenant email domain that you will configure next. For example, if your user is
john.doe@exampleco.com, you should enterexampleco.comfor the email domain.Enter a password for the test user.
Use the default value for Connection.
Select Create.
Configure service provider tenant
Configure the SP tenant to communicate with the IdP tenant for SSO using the SAML protocol.
Switch to your SP tenant. Open the tenant menu, select Switch Tenant, and then select your SP tenant.
Go to Dashboard > Authentication > Enterprise and select SAML.
Select Create Connection.
Enter the following information, and select Create:
Setting Description Connection Name Enter any name, such as SAML-Auth0-IDP.Sign In URL Enter the SAML Protocol URL value that you copied in above. Sign Out URL Enter the same URL as for the Sign In URL above. X509 Signing Certificate Click on the red UPLOAD CERTIFICATE... button and select the .pemfile you downloaded above.Switch to the Setup view to see the metadata associated with the tenant. Copy and save the URL.
Open a new browser tab and navigate to the URL you copied previously. (If you are logged in on the Auth0 Docs site, the settings will pre-populate with the correct values.)
Locate Entity ID, and then copy and save its contents. It will look like:
urn:auth0:{yourTenant}:{yourConnectionName}. Replace{yourConnectionName}with the name of the connection you created for your IdP tenant.Locate Metadata, and copy and save the provided URL. It will look like:
https://{yourDomain}/samlp/metadata?connection={yourConnectionName}. Replace{yourConnectionName}with the name of the connection you created for your IdP tenant.Go to the URL you previously copied to display the metadata for this connection in the SP tenant. Alternatively, your browser may prompt you to save the metadata file.
Locate the row that starts with AssertionConsumerService, and copy and save the value of the Location field. It will be a URL of the form:
https://{yourDomain}/login/callback?connection={yourConnectionName}. This is the URL on your SP tenant that receives the SAML assertion from the IdP tenant. In the next section, you will provide this URL to the IdP tenant so it knows where to send the SAML assertion.
Add service provider metadata to IdP
Add information about the SP tenant to the IdP tenant so it knows how to receive and respond to SAML authentication requests.
Switch to your IdP tenant. Open the tenant menu, select Switch Tenant, and then select your IdP tenant.
Go to Dashboard > Applications > Applications and select the name of the IdP application you created previously.
Switch to the Addons view.
Select SAML2 Web App to view its options, and locate the Application Callback URL. Paste the AssertionConsumerService URL that you copied previously.
In the Settings code block, locate the
audiencekey, and uncomment it, then remove the comma from the end of the line and replace the original value (urn:foo) with the Entity ID value you copied previously (including your connection name). The new line should look like: "audience":"urn:auth0:{yourTenant}:{yourConnectionName}".Select Enable.
Test IdP
In the same window, scroll up, and select Debug. A login screen will appear.
Log in with the credentials of the test user you created above. If your configuration is correct, it will display "It works!", and the encoded and decoded SAML response that would be sent to the IdP.
Check the decoded SAML response, locate
<saml:Audience>, and make sure it matches the Entity ID you entered on the previous screen.Select Close this window.
Create application to test SAML connection
Create a simple application to test the SAML connection you created.
Switch to your SP tenant. Open the tenant menu, select Switch Tenant, and then select your SP tenant.
Go to Dashboard > Applications > Applications and select Create Application.
Enter an application name, select Regular Web Application as the application type, and then select Create.
Copy and save the Domain and Client ID values.
Locate the Allowed Callback URLs field, and enter
http://jwt.io. This is the list of allowed callback URLs to which users will be redirected after authentication. The URL(s) entered here must match the callback URL in the HTML code created in the next step. Normally you would enter a URL for your application, but to keep this example simple, the test user will be sent to the Auth0 JWT online tool, which provides some information about the JSON Web Token (JWT) returned at the end of the authentication sequence.Select Save Changes.
Switch to the Connections view, locate the SAML connection you created under the Enterprise section, and enable it.
Test connection between service and identity provider
Test to ensure the SAML configuration between your SP tenant and IdP tenant works.
Go to Dashboard > Authentication > Enterprise and select SAML.
Locate the SAML connection you created, and select the Try arrow icon. Since you previously logged in while testing this connection, you should be sent directly to the "It works!" screen. If you see the login screen, log in using your test user's credentials.
If the configuration is set up correctly, you will see "It works!", and the page will display the contents of the SAML authentication assertion sent by the IdP tenant to the Auth0 tenant.
If it is not configured correctly, double-check your steps. If you are still having trouble, consult the troubleshooting section at the end of this document.
Create a web page for test application
Create a simple web page that invokes the Lock widget triggering the SAML login sequence.
Create an HTML page, and insert the following HTML and JavaScript code. Replace
{yourClientId}and{yourDomain}with the actual values of the application you registered above. (If you did not note those values, you can find them in the Application Settings on your SP tenant.)<!DOCTYPE html> <html lang="en"> <body> <button type="button" onclick="login()">Log in</button> <script src="https://cdn.auth0.com/js/auth0/9.19.0/auth0.min.js"></script> <script> var auth0 = new auth0.WebAuth({ domain: YOUR_AUTH0_DOMAIN, clientID: YOUR_CLIENT_ID, redirectUri: URL_TO_THIS_PAGE, responseType: 'token id_token', scope: 'openid email profile' }) auth0.parseHash(function(err, data) { if (err) { console.log(err) } if (data) { console.log('Login successful!') console.log(data) } }) window.login = function() { auth0.authorize() } </script> </body> </html>Was this helpful?
/You can also replace
audiencewith the appropriate value for your application, but for the purposes of this test, a placeholder is sufficient. If you do specify theaudienceparameter, ensure that it matches an identifier of an existing API you have configured in Auth0.Save the HTML file where you can access it from a browser.
Test sample application
Test the sample HTML application that uses the Auth0 SAML connection you created in your SP tenant to perform SSO authentication against the IdP tenant.
Open the HTML file you created above with a browser. You should see a login button.
Click Login. You should see the Lock widget with one option. If you have other connections turned on for your application, the screen may look different. If you are prompted for an email address, make sure the email address you enter has the same domain name as the domain you entered in the Settings view for the application in the first tenant.
Click the blue button, which may say saml or ACCESS. Whether you are prompted for credentials or immediately redirected to the callback URL depends on whether you still have an active session.
Troubleshoot test scenario
Clear your browser history and cookies each time before you test. If you do not, the browser may not pick up the latest version of your HTML page, or it may have stale cookies that affect execution.
Capture an HTTP trace of the interaction. Many tools will capture the HTTP traffic from your browser for analysis.
Search the internet for "HTTP Trace" to find and install a tool.
Capture the login sequence from start to finish and analyze the trace. Track the sequence of GETs to see how far in the expected sequence you get. You should see a redirect from your original site to the SP tenant and then to the IdP tenant, a POST of credentials if you had to log in, then a redirect back to the callback URL or the SP tenant, and then a redirect to the Callback URL specified in your application.
Ensure that cookies and JavaScript are enabled for your browser.
Ensure that the Callback URL specified in the HTML file is also listed in the Allowed Callback URLs field for your application. To do so, go to Dashboard > Applications > Applications and select the name of your application, then locate Allowed Callback URLs.
Use the http://samltool.io tool to decode a SAML assertion.

