Configure SAML Identity Provider-Initiated Single Sign-On
Many instructions for setting up a SAML federation begin with Single Sign-on (SSO) initiated by the service provider. The service provider redirects the user to the identity provider (IdP) for the purposes of authentication. This process is commonly used for consumer-facing scenarios.
However, in enterprise scenarios, it is sometimes common to begin with the IdP initiating SSO instead of the service provider. For example, an enterprise might set up a portal to ensure that users navigate to the correct application after they sign on to the portal.
Risks and considerations
IdP-Initiated flows carry a security risk and are therefore not recommended. The recommendation is to use SP-Initiated flows whenever possible.
Make sure you understand the risks before enabling IdP-Initiated SSO. In this scenario, Auth0 receives the unsolicited response from the IdP and the application receives the unsolicited response from Auth0. Neither entity can verify that the user started the flow. Because of this, enabling this flow opens the possibility of an Login CSRF attack, where an attacker can trick a legitimate user into unknowingly logging into the application with the identity of the attacker.
OpenID Connect IdP-initiated flow
OpenID Connect (OIDC) does not support the concept of an IdP-Initiated flow. So while Auth0 offers the possibility of translating a SAML IdP-Initiated flow (from a SAML connection) into an OIDC response for an application, any application that properly implements the OIDC/OAuth2 protocol will reject an unrequested response.
When using OIDC applications, the best option is to have your application create a login endpoint. This endpoint’s sole purpose is to initiate the redirect back to the IdP (your Auth0 tenant).
If you use multiple IdPs, be sure that the login endpoint is either specific to the identity provider or can accept a parameter to identify which IdP initiates the workflow.
An alternative approach is to have users start the login flow at the application.
Post-back URL
When using IdP-Initiated SSO, make sure to include the connection parameter in the post-back URL:
https://${yourDomain}/login/callback?connection={yourConnectionName}Was this helpful?
If you are using the Organizations feature, you can optionally include an organization parameter containing the organization ID of the desired organization:
https://{yourDomain}/login/callback?connection={yourConnectionName}&organization={yourCustomersOrganizationId}Was this helpful?
Lock/Auth0.js
If your application is a single-page application that uses Lock or Auth0.js to process the authentication results, you must explicitly indicate that you want to allow IdP-Initiated flows and thus open the application to possible Login CSRF attacks.
If you are using Auth0.js, you must update the webAuth.parseHash of the library and set the flag __enableIdPInitiatedLogin to true.
var data = webAuth.parseHash(
      {
        ...
        __enableIdPInitiatedLogin: true
        ...
      }
Was this helpful?
If you're using Lock, you can include the flag using the options parameter sent to the constructor.
const lock = new Auth0Lock(clientID, domain, options)
Here's the flag itself:
var options = {
    _enableIdPInitiatedLogin: true
};
Note that the enableIdPInitiatedLogin flag is preceded by one underscore when used with Lock and two underscores when used with the auth0.js library.
Set up IDP-initiated SSO
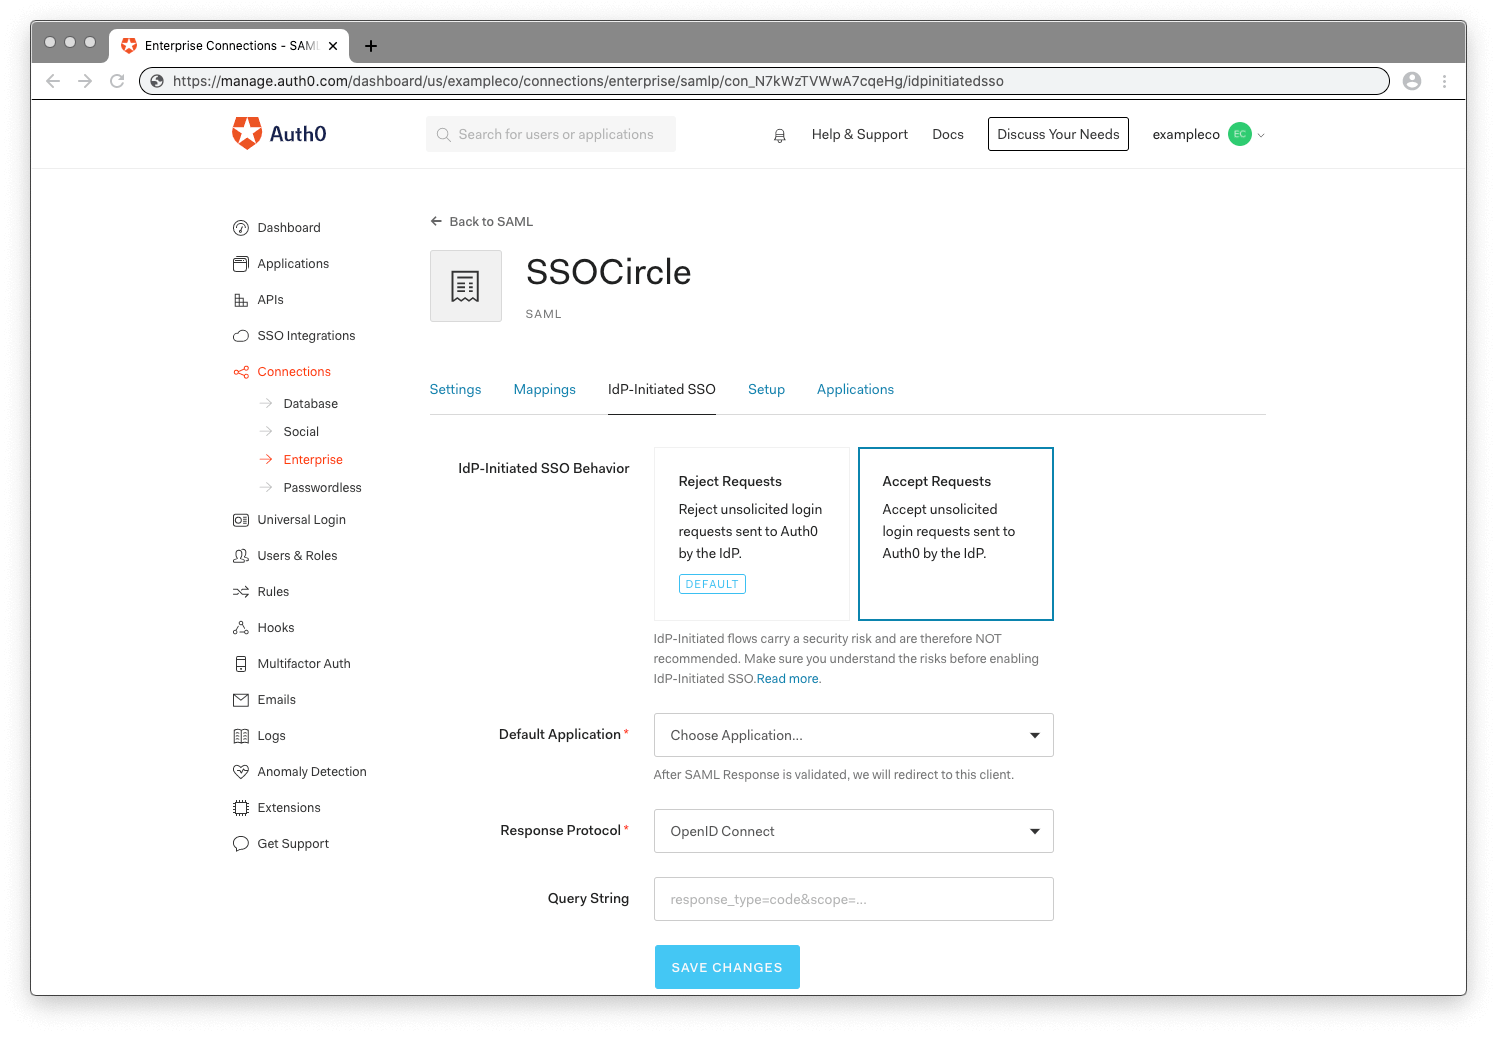
Go to the Dashboard > Authentication > Enterprise and choose SAMLP Identity Provider.
Under Settings you can see the configuration for IdP-Initiated SSO.

IdP-initiated SSO Behavior: This option allows you to enable IdP-initiated logins for the SAML connection. Select Accept Requests and complete all the required fields.
Default Application: When the IdP initiated login succeeds this is the application where users are routed. This setting shows available applications enabled for this connection. Select the application from the dropdown that you want the users to login with IdP initiated. Only one application can be selected for an IdP-initiated login per SAML connection.
Response Protocol: This is the protocol used to connect your selected Default Application. Most commonly, applications are configured with the OpenID Connect protocol (see above). However, if you have configured a SAML2 Web App addon for your application and want to route the SAML assertion you will need to select SAML.
Query String: Query string options help to customize the behavior when the OpenID Connect protocol is used. You can set multiple options similar to setting parameters with a query string. You can set:
Setting Description redirect_uriWhen the IdP-initiated login has completed the request is then redirected to the first URL listed in the Allowed Callback URLs for the application. However, if you se a redirect_uri, the IdP will redirect to this URL. This adds flexibility for cases such as when you have a set subdomain scheme with a wildcard and you only want to redirect to one specific subdomain.scopeDefine scopes for the ID token sent. You can set multiple scopes. response_typeSet the token for the Implicit Grant Flow for SPAs. You can set code for the Authorization Code Grant Flow for regular web apps. Example Query String:redirect_uri=https://jwt.io&scope=openid email&response_type=token
Application drop-down list limited to 100
If you want to select an application as the Default Application in IdP-initiated SSO, and the application isn't in the first 100 applications listed in the drop-down list for your tenant, you must use the Management API to select that application. You must run a patch:
{
"options": {
"signInEndpoint": "https://amicusrx.okta.com/app/amicustherapeutics_bmram_1/exk5h261zoNr0YzZW2p7/sso/saml",
"idpinitiated": {
"client_id": "YOUR_CLIENT_ID",
"client_protocol": "saml",
"client_authorizequery": ""
},
"signingCert": "[copied-from-GET]"
}
}
Was this helpful?
